Steps to register Party Course
Opening Party Course Form
You will find the Party Course at left side in Party Course tab.
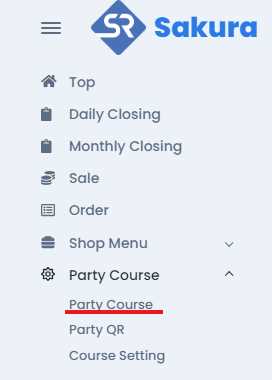
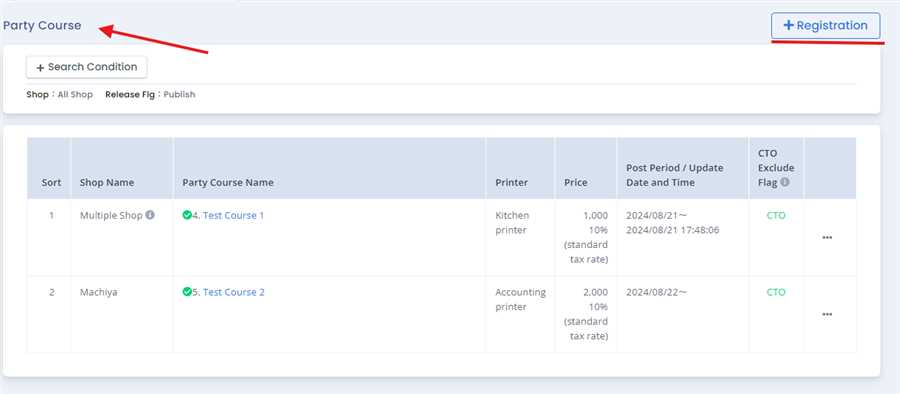
Click on Party Course and you find the Party course Tab, go through the party course tab, and click on party course, then you will find the party List with registered party course with their information, where you will find the Registration button on the top right.
Party Course Form
After pressing Registration button, party course registration form opens up where you can fill up required information like party course name, price, tax, party menu, image etc and press Registration button to register the party course. Note: Red astreix mean the required field in necessary and must me filled and must not be left empty or blank. After filling up the form with required information and pressing Registration button a dialogue box appears to confirm the registration, if confirmed Registration of the party course is complete. Shop: This is used to select the shop in which you want to display your menu.
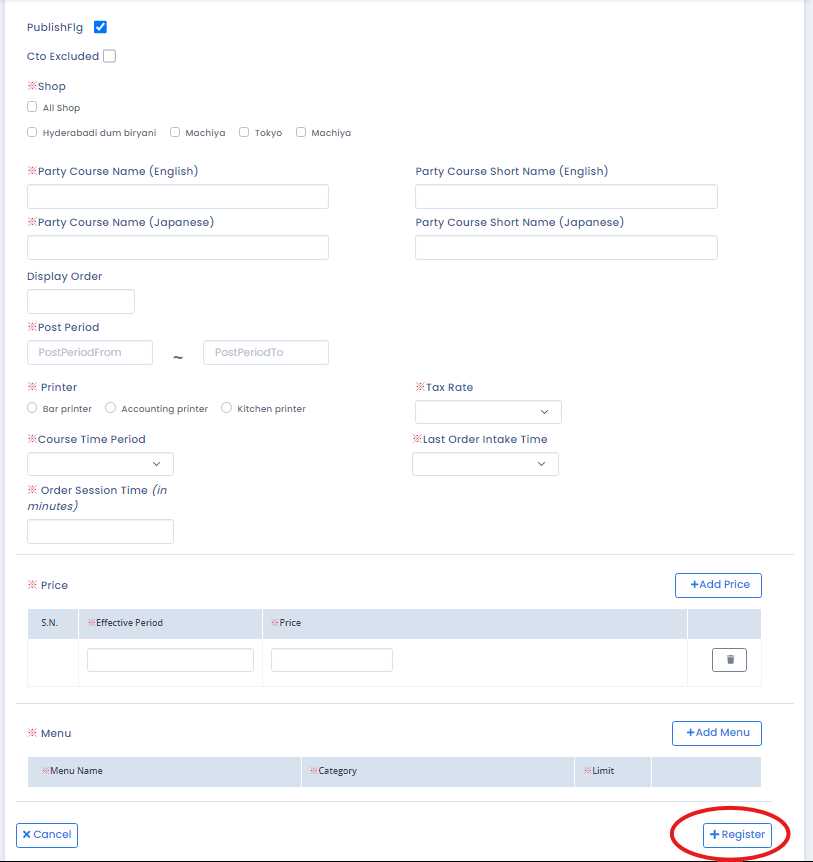
Party Course Name (English): This field contain the name of a Party Course in English language which is also a required field. There is another field with it name as Party Course Name Short Name (English), in which short name for that Party Course is entered. The Party Course Short Name (English) is optional. Note: You can customized Party Course name as you want to display the original name or the Party Course Short Name. Party Course Name (Japanese): This field contain the name of a Party Course in Japanese language which is also a required field. There is another field with it name as Party Course Short Name (Japanese), in which short name for that Party Course is entered. The Party Course Name Short Name (Japanese) is optional. Note: You can customized Party Course name as you want to display the original name or the Party Course Short Name.
Post Period: Post Period is that kind of filed in which the Date are entered in which that Date determine the effective time of that menu in the selected shop. In another way You need to enter the Post period to display your menu from the time you entered to the time you have entered. During the entered time period that menu will be effective in the shop.
Tax Rate: Tax Rate is a dropdown filed in which the Tax rates are visible in that dropdown, which is need to be selected according to the party course you are creating. Note: Only the tax rate that has been added while creating the shop and company are shown in this dropdown.
Printer: while creating the party course you need to choose the type of printer you are using in your shop. for eg: kitchen printer, Accounting printer, Bar printer etc.

Course Time Period : While creating the party course you need to choose the total time of the party course.
Last Order Intake time : This dropdown sets the time whether the customer can order before closing the party course. For e.g. : If the course time is 1 hour and last order intake time is 15 min then the customer can only order at 45 min and cannot take any order after 45 mins.
Order session time : This allows us to divide the party course into certain time period according to data entered.
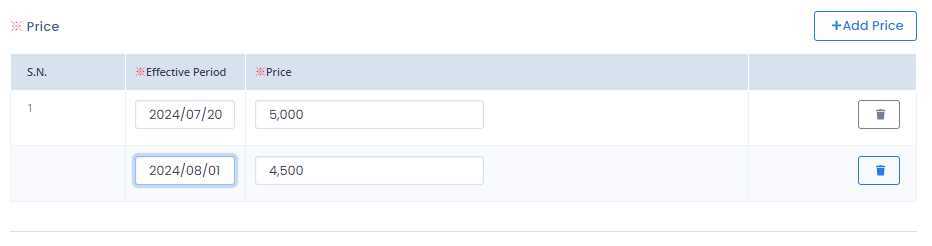
Price: The Price Section is used to enter the Price of that party course you are creating. There is facility of making the menu price different for the different period of time. You can set price of some amount till the date that you selected at effective period. Then you can Add price for other period of time with another amount of money. You can add multiple price for the different set of time period. as shown in above:
Adding Menu in Party Course
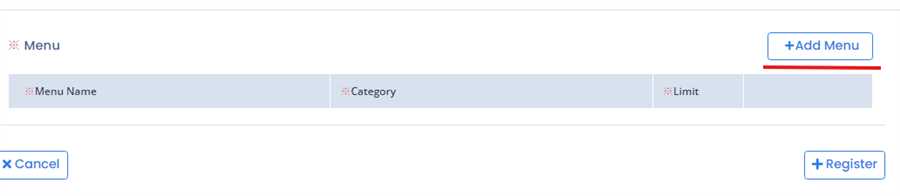
You can add menu by pressing add menu button as shown in figure below. Note the registered menu is shown only for selected shop.
After pressing add menu it redirects to another page which contains two column named Menu to Add and Added Menu. In first column shows the list of register menu in registered shop. User can check checkbox which add the menu to second column , the menu added in second column is the menu added to party course.
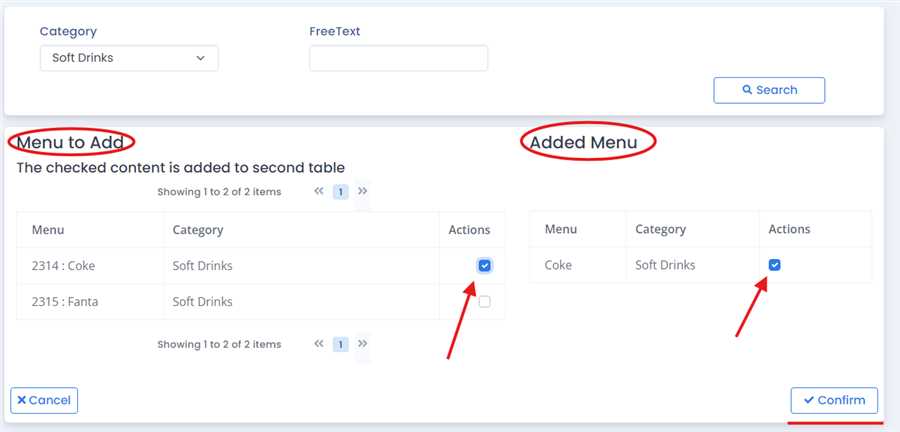
User can add/remove the menu form the list to the list of the party course by checking or unchecking the menu registered. Finally, confirm button is pressed to confirm the menu in the party course. It can be edited any time by pressing Add Menu button
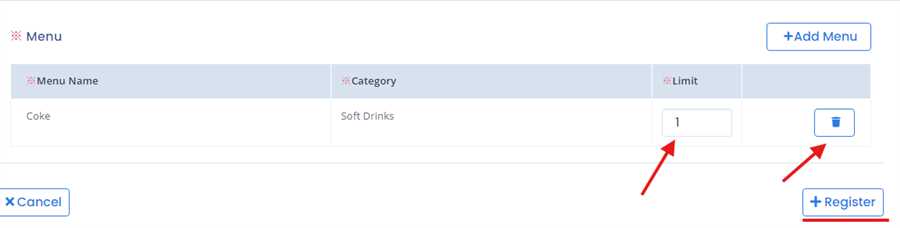
After adding menu it appears in the list as shown below. User can add limit to the menu which denotes the limit that the user can order in certain time period. User can also press trash icon to remove the menu from the list as shown in the figure below:
Finally, filing out all the necessary information user can press registration to register the party course. By this process/ procedure you can simply make an entry of a Party Course in the POS system.